How to Fit a Skylight? Step-by-Step Skylight Installation Guide
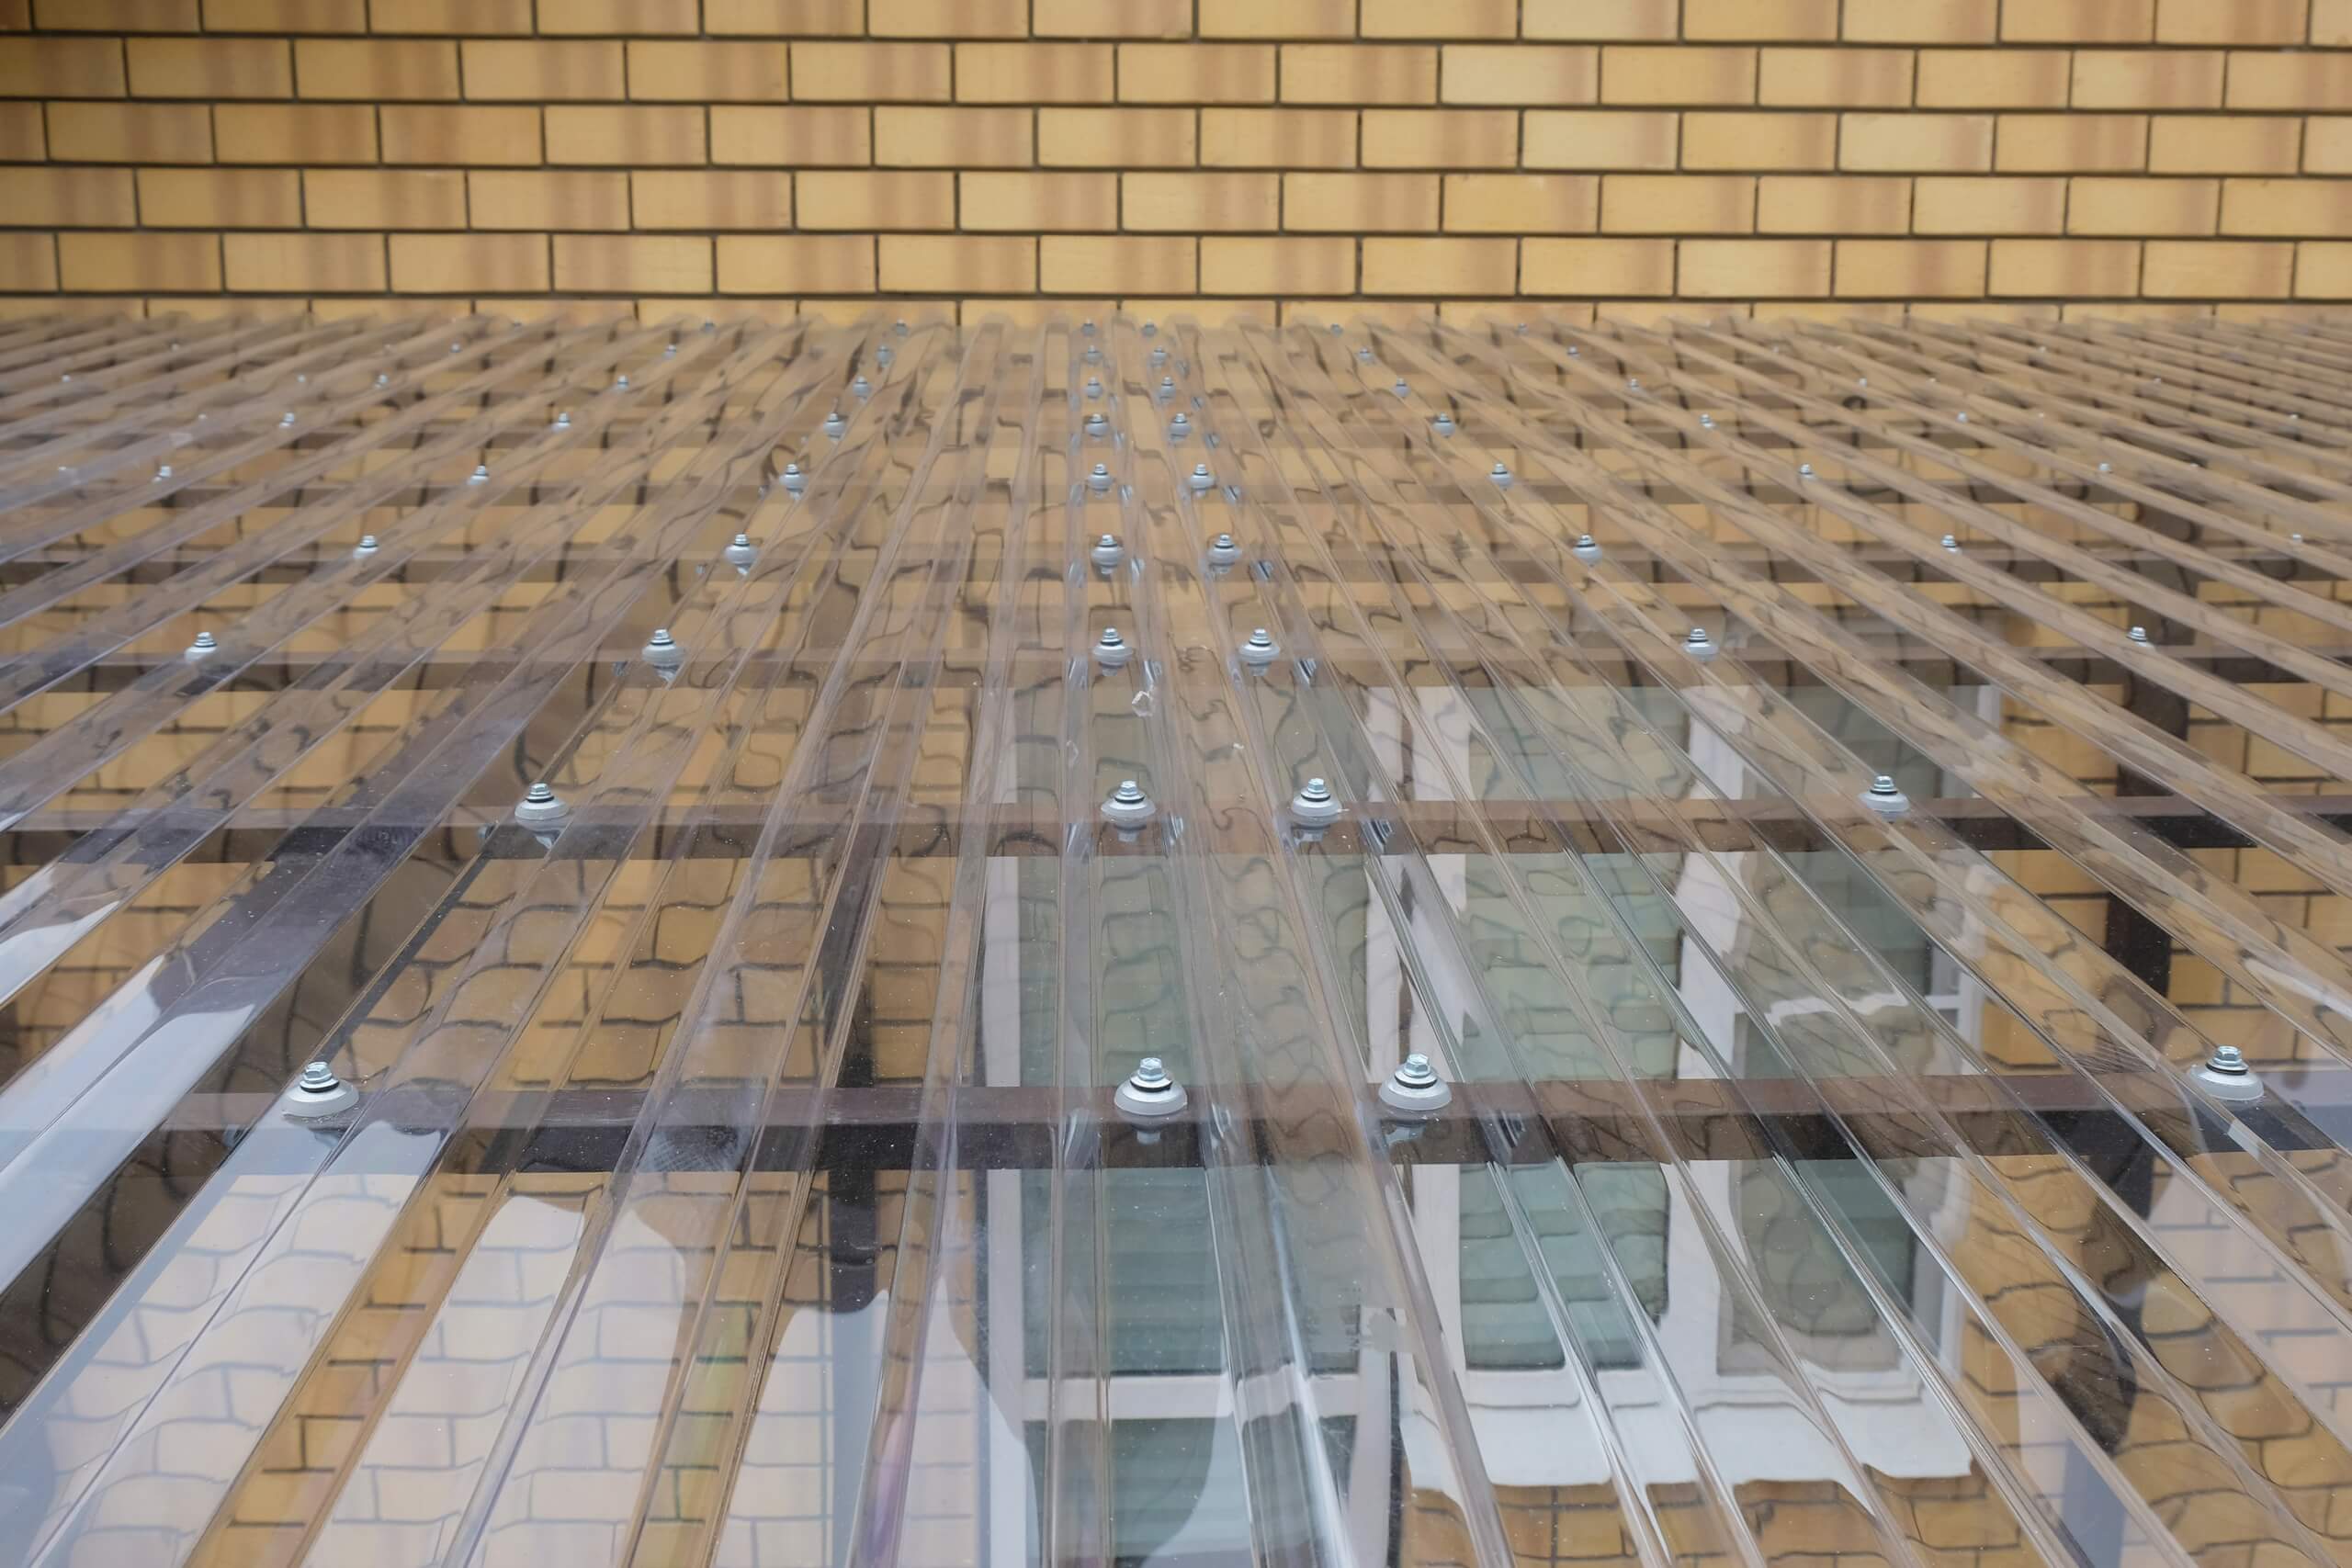
Installing a skylight can bring more natural light into a home, warehouse, patio, covered walkway, or outdoor canopy. However, achieving a secure and weather-resistant result requires more than simply fixing a transparent sheet to the roof.
A poorly installed skylight may leak, rattle, crack around the fasteners, collect debris, or fail prematurely because the polycarbonate sheet cannot expand and contract as temperatures change.
This guide explains how to fit a skylight step by step, with a focus on profiled polycarbonate skylight sheets installed within metal roofing systems or used as part of a canopy roof.
Quick Answer: How Do You Fit a Skylight?
To fit a profiled polycarbonate skylight correctly:
- Choose a polycarbonate sheet that matches the adjoining roof profile.
- Confirm the roof structure, slope, supports, and drainage.
- Measure and mark the skylight position.
- Cut the polycarbonate sheet using a fine-tooth blade.
- Position the sheet without stretching or forcing it.
- Allow space for thermal expansion around every fixing.
- Use suitable skylight fasteners with weather-sealing EPDM washers.
- Install the screws vertically without overtightening them.
- Complete the overlaps, flashings, closures, and seals.
- Inspect and water-test the finished installation.
The sheet, fasteners, structure, flashing, and drainage system must work together to provide long-term performance.
Table of Contents
- Understanding the Skylight System
- Checking the Roof Structure, Pitch, and Drainage
- Choosing a Compatible Polycarbonate Sheet
- Selecting the Correct Skylight Fasteners
- Tools, Materials, and Safety Equipment
- Measuring and Marking the Installation Area
- Preparing Purlins and Battens
- Cutting the Polycarbonate Sheet
- Positioning the Skylight Sheet
- Installing Expansion Holes and Fasteners
- Completing Overlaps, Flashings, and Seals
- Inspecting and Water-Testing the Skylight
- Common Skylight Installation Mistakes
- Skylight Maintenance
- Final Installation Checklist
Important Safety Notice
This guide focuses on profiled polycarbonate skylight sheets installed as part of a corrugated or trapezoidal roof or as the light-transmitting section of a canopy.
It does not replace the installation instructions for proprietary glass skylights, curb-mounted skylights, roof windows, or opening skylight systems.
Roof work involves serious fall and injury risks. Cutting structural roof members, modifying waterproof membranes, or working at height should only be carried out by qualified professionals in accordance with applicable building codes, fall-protection requirements, and local regulations.
Always follow the current instructions provided by the skylight sheet, roofing system, and fastener manufacturers.
1. Understand the skylight system before starting
The first decision is whether the skylight will be a matching profiled sheet integrated into metal roofing, a complete polycarbonate canopy roof, or a framed flat/multiwall glazing system. For an integrated rooflight, the polycarbonate profile must match the adjoining metal sheet in pitch, crest height, valley shape and side-lap geometry. BDN’s installation guidance warns that forcing an “almost matching” profile to fit places stress into the sheet and can create gaps that become leak paths. If no matching profile exists, a properly designed framed opening or proprietary glazing system is safer than stretching or distorting the panel.
Canopy projects illustrate why this design stage matters. Outdoor canopies are site-specific structures that combine engineered steel or aluminium framing with robust roofing, flashings and guttering. Its applications include patios, entertainment areas, entrances, walkways, carports and school shelters. The lesson for any skylight project is simple: the light-transmitting panel is one component of a complete drainage and structural system, not an isolated sheet fixed wherever space is available.
Before measuring or cutting the roof, determine which type of skylight system you are installing.
Common applications include:
- A matching profiled polycarbonate sheet integrated into a metal roof
- A complete polycarbonate canopy roof
- A framed solid or multiwall polycarbonate glazing system
- A transparent roof section over a patio, entrance, walkway, or carport
For an integrated metal roof skylight, the polycarbonate sheet should match the adjoining metal roof sheets in:
- Rib pitch
- Crest height
- Valley shape
- Side-lap geometry
- Overall profile dimensions
Do not force an “almost matching” sheet into the roof profile. Stretching, bending, or distorting the polycarbonate can create internal stress and leave gaps that become potential water-entry points.
When a matching roof profile is unavailable, use a properly designed framed opening or proprietary glazing system instead of forcing an incompatible sheet into position.
Why the Complete Roof System Matters
A skylight sheet is only one part of the roof system. The installation also depends on:
- Structural framing
- Purlins or battens
- Roof slope
- Side and end overlaps
- Flashings
- Gutters
- Closures
- Fasteners
- Sealing materials
Every component must work together to support the sheet and direct water away from the roof.
2. Confirm approvals, structure, roof pitch and drainage
Before ordering materials, check whether the work requires a permit, engineered details or a licensed installer. Confirm that rafters, purlins, battens and surrounding roof sheets can carry the design wind, rain, maintenance and snow loads applicable to the site. Never cut a rafter, truss chord or other structural member without an approved alteration detail.
Set the skylight on a roof plane that drains freely. Corrugated roofing guidance recommends a slope greater than 5 percent and preferably about 10 percent, equivalent to roughly 1:10 or 5.7 degrees. A low pitch slows water, increases the time it remains at laps and fasteners, and raises the importance of sealant and end-lap detailing. Gutters, downpipes and discharge points must also be sized and kept clear so water cannot back up under the sheet.
Before ordering materials, confirm whether the project requires:
- A building permit
- Engineered drawings
- Wind-load calculations
- Snow-load calculations
- A licensed roofing contractor
- Approval from the local building authority
Inspect the rafters, trusses, purlins, battens, and surrounding roof sheets. The structure must support the expected wind, rain, maintenance, and snow loads for the project location.
Never cut or modify a rafter, truss chord, or structural roof member without an approved structural detail.
Recommended Roof Pitch
The skylight should be installed on a roof plane that allows water to drain freely.
For corrugated or profiled roofing, a roof slope greater than 5% is generally recommended. A slope of approximately 10%, or about 1:10, provides better drainage where the roofing system allows it.
A low roof pitch can:
- Slow water drainage
- Increase water exposure at overlaps
- Increase pressure on fastener seals
- Increase the risk of water entering beneath the sheets
- Require more detailed flashing and sealing
Check that gutters, downspouts, and discharge points are properly sized and free from obstructions. Water should not be allowed to back up beneath the skylight sheet.
3. Choose a compatible polycarbonate sheet
Select the sheet by profile, thickness, UV protection, light transmission, tint and span capability. For an integrated skylight, profile compatibility comes first. For a stand-alone canopy, choose a corrugated, solid or multiwall system designed for the framing and loading conditions. Corrugated profiles and solid options come with different levels of direct or diffused light, while project-based approach shows how clear and tinted roofing can be selected to balance daylight, glare, warmth and weather protection.
Check which face carries the UV-protective layer and install that face toward the sun. Keep the protective film in place while measuring and cutting, but remove it promptly after installation so it does not bake onto the surface. Store sheets flat, fully supported, dry and shaded. Do not leave a stacked bundle exposed to direct sun, where trapped heat can distort the panels.
Select the polycarbonate sheet according to:
- Roof profile
- Sheet thickness
- UV protection
- Light transmission
- Tint
- Span capability
- Wind-load requirements
- Impact resistance
- Manufacturer recommendations
For a skylight integrated into metal roofing, profile compatibility should be the first consideration.
For a stand-alone canopy, choose a corrugated, solid, or multiwall polycarbonate system designed for the framing and environmental conditions.
Check the UV-Protected Side
Many polycarbonate roofing sheets have a UV-protective layer on only one side.
Make sure the UV-protected face is installed toward the sun. Installing the sheet upside down may reduce its service life and cause premature discoloration or deterioration.
Keep the protective film on the sheet while measuring and cutting. Remove it promptly after installation so the film does not become permanently bonded to the surface by heat and sunlight.
Store the Sheets Correctly
Before installation:
- Store sheets flat and fully supported.
- Keep them dry and shaded.
- Protect them from wind.
- Do not leave stacked sheets exposed to direct sunlight.
- Avoid placing heavy materials on top of the sheets.
Heat trapped between stacked polycarbonate panels can cause distortion.
4. Select the correct fastener for the substrate
Polycarbonate expands and contracts much more than steel or timber. A conventional roofing screw installed through a tight hole can restrain that movement, concentrate stress and eventually cause cracking or buckling. The fixing therefore needs an oversized thermal-expansion hole and a flexible weather seal.
BDN Fasteners™ POLY-FAST™ fasteners combine these functions. The integrated cutter forms a nominal 11 mm expansion hole while the screw fixes the sheet to the supporting purlin. Depth-stop knurls are designed to limit over-run, and a 25 mm domed, weatherseal, anti-static EPDM washer with two sealing rims covers the enlarged hole. For steel, POLY-FAST™ Metal is a #12-14 x 60 mm self-drilling fastener rated by BDN Fasteners™ for steel up to 4.5 mm. POLY-FAST™ Timber is a #12-11 x 50 mm Type 17 fastener requiring at least 25 mm timber penetration. POLY-FAST™ Duo is intended for mixed metal and timber work, with the final choice subject to the support thickness and project specification. [2]
BDN Fasteners™ POLYXPAND™ is another metal-substrate option. Its drill-point wings create an expansion hole and break off when they contact the steel. Whichever system is selected, verify sheet profile, support thickness, fastener length, corrosion exposure and washer compatibility against the current product data. Where dedicated one-step fasteners are not used, pre-drill expansion holes to the sheet manufacturer’s specified diameter rather than using a tight pilot hole.
Polycarbonate expands and contracts more than steel or timber as temperatures change.
A conventional roofing screw installed through a tight hole may restrict this movement. Over time, the concentrated stress can lead to:
- Cracking around the fixing point
- Buckling
- Sheet distortion
- Enlarged holes
- Water leakage
- Premature sheet failure
A proper skylight fixing system should provide:
- An expansion hole around the screw
- Secure penetration into the supporting structure
- A flexible weather seal
- Controlled washer compression
- Compatibility with the polycarbonate sheet
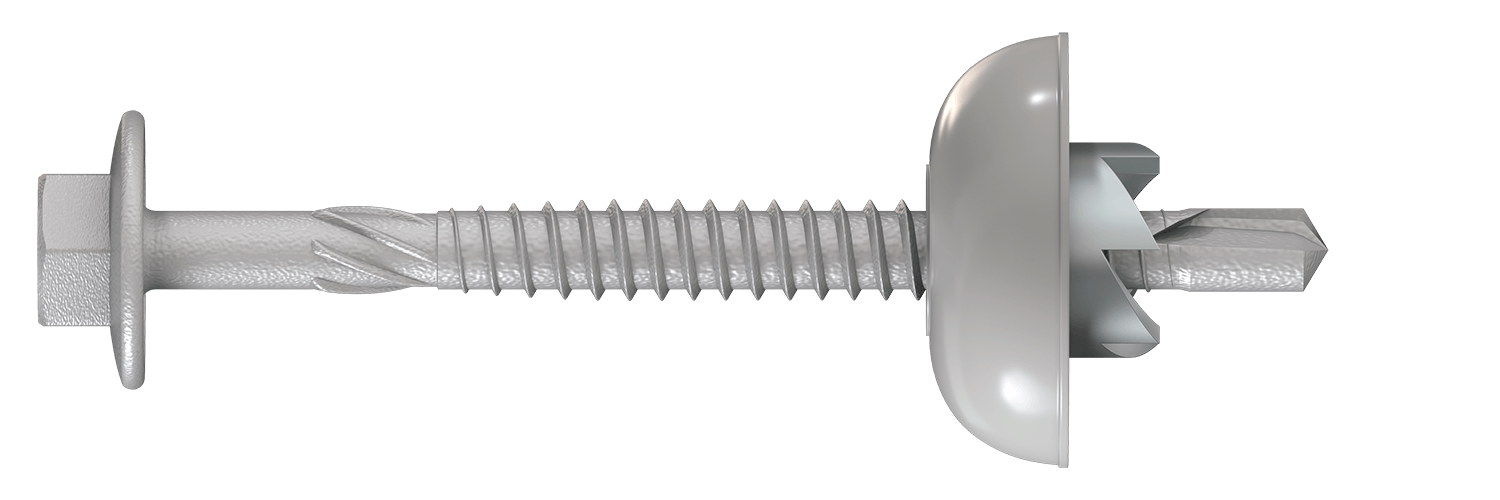
POLY-FAST™ Metal
POLY-FAST™ Metal is designed for fastening polycarbonate roofing to steel supports.
Typical specification:
- Size: #12-14 × 60 mm
- Substrate: Steel
- Stated steel capacity: Up to 4.5 mm
- Expansion hole: Nominal 11 mm
- Washer: 25 mm domed EPDM weather seal
Always confirm the actual steel thickness and current product specifications before installation.
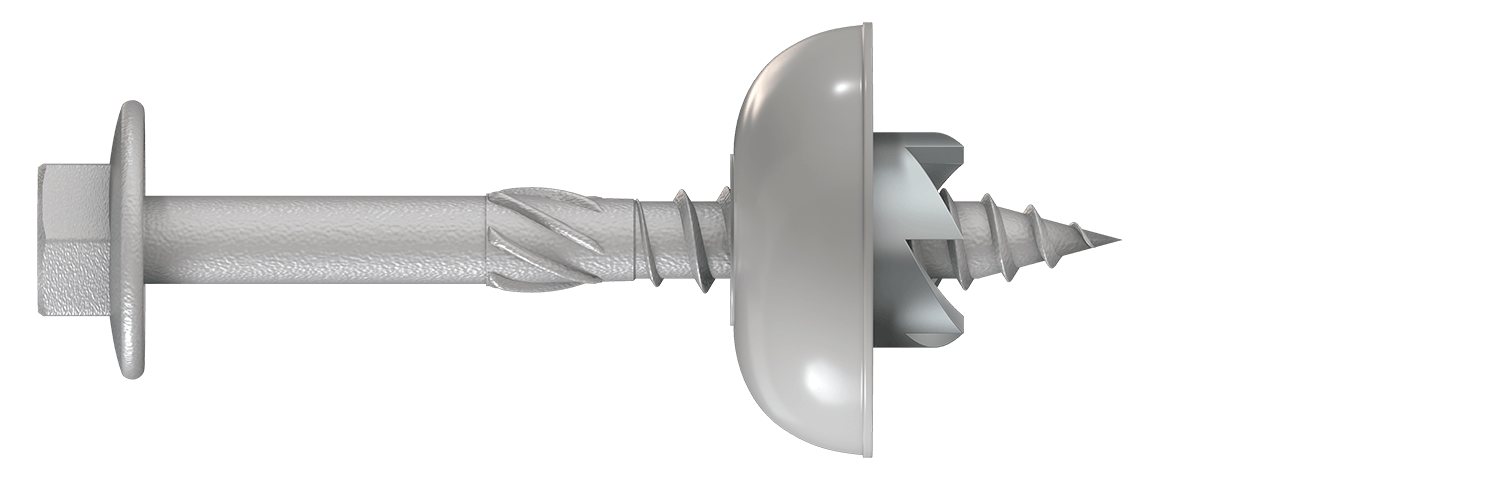
POLY-FAST™ Timber
POLY-FAST™ Timber is designed for fixing polycarbonate roofing to timber battens or purlins.
Typical specification:
- Size: #12-11 × 50 mm
- Point type: Type 17
- Substrate: Timber
- Recommended timber penetration: At least 25 mm
- Expansion hole: Nominal 11 mm
- Washer: 25 mm domed EPDM weather seal
Check that the timber is structurally sound and that the fastener maintains suitable edge distances and embedment.
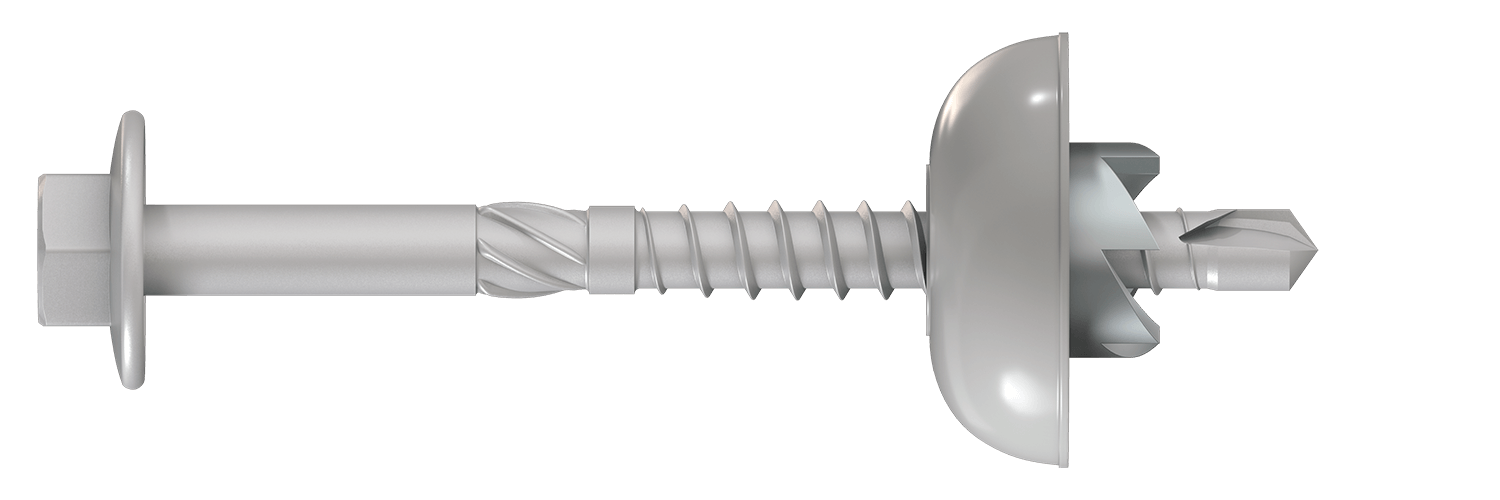
POLY-FAST™ Duo
POLY-FAST™ Duo is intended for projects involving mixed steel and timber substrates.
The correct fastener should be selected according to the actual support material and thickness—not simply according to the visible roof surface.
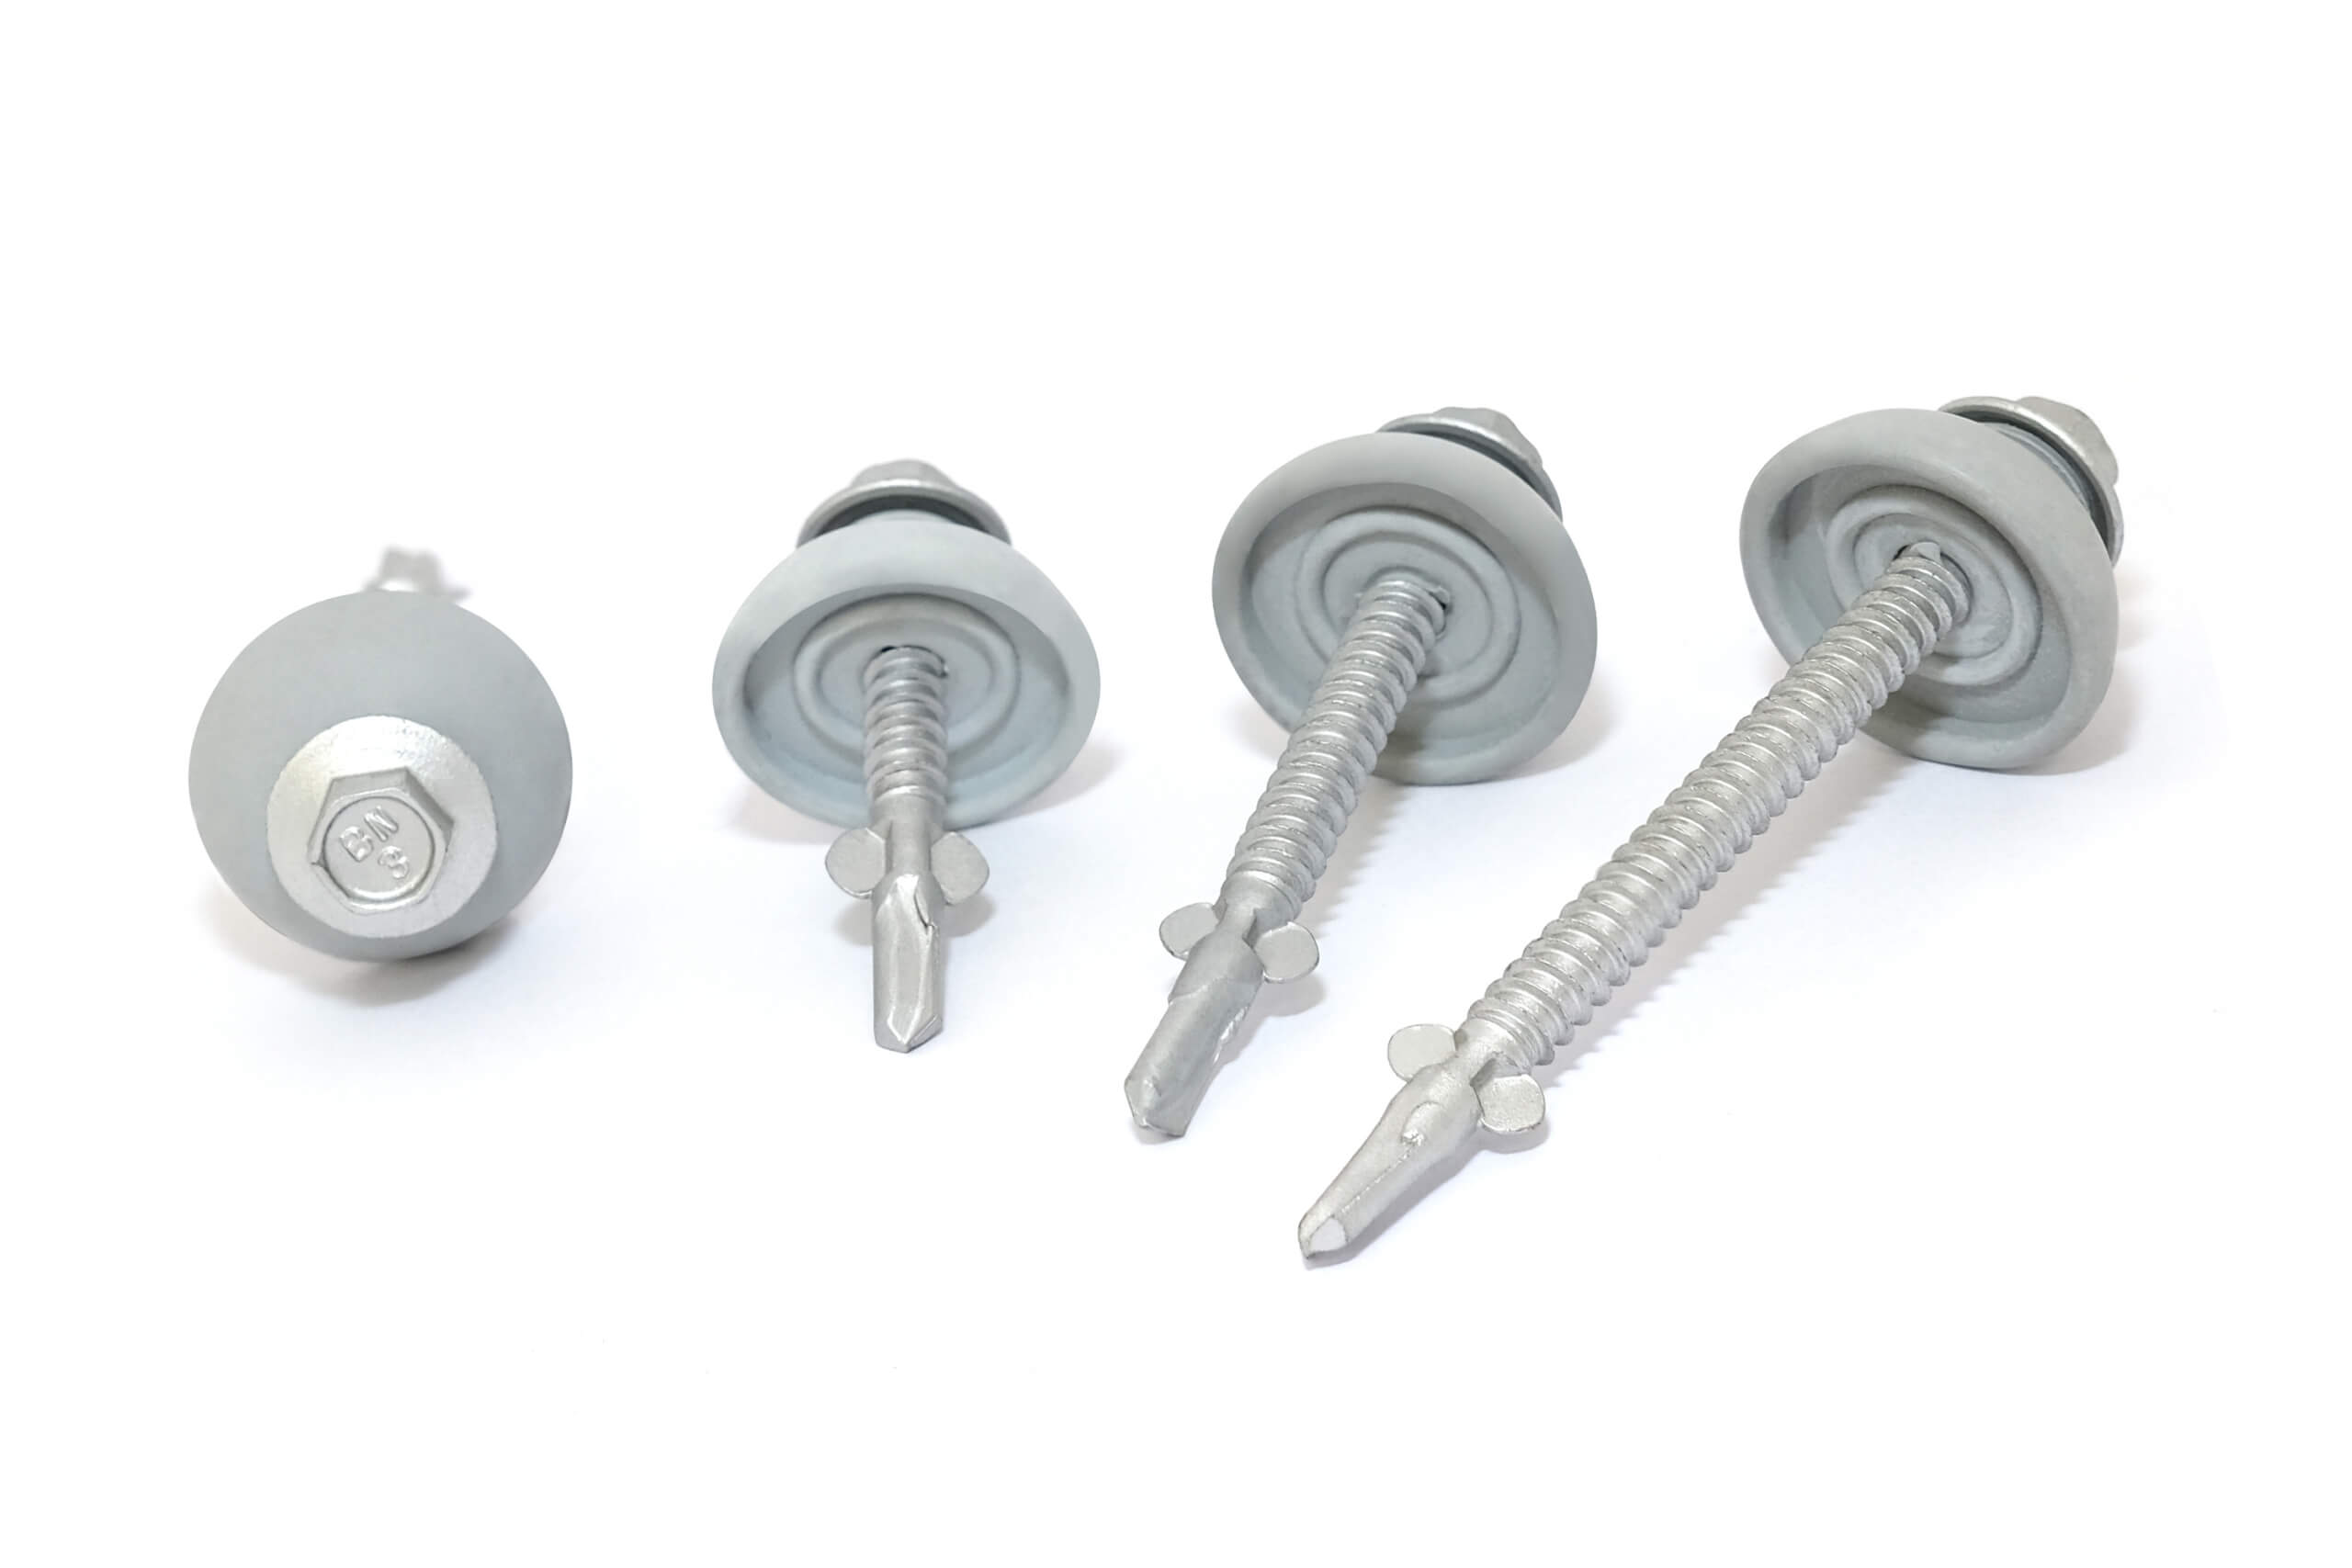
BDN FASTENERS® POLYXPAND™
POLYXPAND™ is another skylight fixing option for steel substrates.
Its drill-point wings create an expansion hole in the polycarbonate sheet. The wings then break away when they contact the steel support, allowing the drill point to penetrate the metal.
As with all skylight fasteners, correct vertical installation and washer compression are essential.
Skylight Fastener Selection at a Glance
| Support Material | BDN Fastener Option | Typical Capacity | Installation Focus |
|---|---|---|---|
| Steel purlin | POLY-FAST™ Metal #12-14 × 60 mm | Steel up to 4.5 mm | Create an 11 mm expansion hole, drive vertically, and do not crush the EPDM washer |
| Timber batten | POLY-FAST™ Timber #12-11 × 50 mm | Minimum 25 mm timber penetration | Confirm suitable embedment and edge distance |
| Mixed steel and timber | POLY-FAST™ Duo #12-11 × 50 mm | Subject to the actual substrate | Identify the supporting material before selecting the fastener |
| Steel purlin | POLYXPAND™ | Versions available for different steel thicknesses | Expansion wings form the hole before the screw engages the steel |
Product capacities are specific to each fastener. Confirm the current technical data, coating specification, support thickness, and local design requirements before use.
5. Assemble tools, accessories and safety equipment
Typical tools include a tape measure, straightedge, non-permanent marker, drill/driver with an adjustable clutch, the correct magnetic hex socket, a fine-tooth circular saw or jigsaw, a stable cutting bench, soft brushes for swarf removal, and sealant application tools. Materials may include profile-matched foam infill strips, noise-stop or isolation tape, neutral-cure polycarbonate-compatible silicone, butyl or approved sealing tape, apron or back-channel flashing, barge and ridge capping, and the specified fasteners. [6][8]
Use eye, hearing and hand protection. Plan safe roof access, edge protection and fall arrest before starting. Palram specifically states not to step directly on polycarbonate panels; use supported crawling or stepping boards that distribute weight to the structure. Stop work in strong winds or rain, when large lightweight sheets can become difficult to control.
Typical tools may include:
- Tape measure
- Straightedge
- Non-permanent marker
- Drill or impact driver with adjustable speed
- Adjustable clutch
- Correct magnetic hex socket
- Fine-tooth circular saw or jigsaw
- Stable cutting bench
- Clamps
- Soft brush
- Clean compressed air
- Sealant application tools
Typical materials may include:
- Profile-matched polycarbonate sheets
- Skylight fasteners
- Profile-matched foam closures
- Isolation or noise-reduction tape
- Polycarbonate-compatible neutral-cure silicone
- Approved butyl sealing tape
- Apron flashing
- Head flashing
- Back-channel flashing
- Barge capping
- Ridge capping
- Gutter components
Personal Protective Equipment
Wear suitable:
- Eye protection
- Hearing protection
- Cut-resistant gloves
- Non-slip footwear
- Fall-protection equipment
Do not step directly on polycarbonate roofing sheets. Use supported crawling boards or stepping boards that transfer weight to the structural framing.
Stop work during rain or strong winds. Large polycarbonate sheets are lightweight and can become difficult or dangerous to control.
6. Measure and set out the opening or sheet run
Measure the actual roof, not only the drawing. Mark purlin positions, sheet side laps, end laps, flashing lines and the exact daylight area. For an integrated metal roof skylight, work out how the polycarbonate sheet will replace one or more metal sheets while maintaining continuous corrugation and drainage. The open side of a side lap should face away from the prevailing wind and rain. [1]
Avoid creating small unsupported strips at the skylight edges. The panel should land squarely on its supports without being pulled sideways. Check diagonals before cutting or drilling; a skewed sheet will not sit naturally in the profile and may lift at the laps.
Measure the actual roof rather than relying only on the architectural drawing.
Mark:
- Purlin positions
- Skylight boundaries
- Sheet side laps
- Sheet end laps
- Flashing lines
- Fastener positions
- The daylight opening
For a skylight integrated into an existing metal roof, determine how the polycarbonate sheet will replace one or more metal sheets while maintaining continuous ribs and drainage paths.
Check the Prevailing Weather Direction
The open side of a side lap should face away from the prevailing wind and rain wherever possible.
This helps reduce the risk of wind-driven water entering beneath the overlap.
Check the Sheet Alignment
The skylight sheet should sit naturally on the supports.
Avoid creating narrow, unsupported strips along the edges. Do not pull the sheet sideways to make it align with the surrounding roof.
Check the diagonal measurements before cutting or fastening. A sheet installed out of square may lift at the overlaps or place stress on the fasteners.
7. Prepare purlins, battens and contact surfaces
Straighten or replace damaged supports. Remove sharp edges, old fasteners, rust scale and debris that could abrade the underside of the polycarbonate. Confirm purlin spacing against the sheet manufacturer’s span table because profile and thickness determine the allowable distance. Some manufacturers differentiate end spans from internal spans and varies spacing by profile; these figures should not be transferred blindly to another product.
Apply approved isolation or noise-stop tape where plastic rests on metal to reduce rubbing and thermal creaking. Fit profile-matched eave infill strips where required to limit wind-driven rain, dust and insects. Use a light or reflective treatment on timber beneath clear sheets to reduce local heat absorption; use only materials confirmed compatible with the chosen polycarbonate.
Inspect the roof supports before placing the sheet.
Repair or replace:
- Bent purlins
- Damaged battens
- Corroded framing
- Loose connections
- Uneven supports
Remove:
- Old fasteners
- Sharp edges
- Rust flakes
- Metal shavings
- Dirt
- Construction debris
Sharp or uneven surfaces may scratch or abrade the underside of the polycarbonate sheet.
Confirm Purlin Spacing
Check the sheet manufacturer’s span table.
Allowable support spacing depends on:
- Sheet profile
- Sheet thickness
- Wind load
- Snow load
- Internal or end-span position
- Local building requirements
Do not apply the support spacing from one polycarbonate product to another without confirmation.
Use Isolation Tape Where Required
Approved isolation or noise-reduction tape can be installed where the polycarbonate contacts metal supports.
This can help reduce:
- Rubbing
- Thermal movement noise
- Creaking
- Surface abrasion
Use only materials confirmed as compatible with polycarbonate.
8. Cut the polycarbonate cleanly
Support the sheet close to both sides of the cut. Use a fine-tooth blade suitable for plastics, run the tool at a high blade speed with a controlled feed rate, and prevent vibration. It is also recommended to use tungsten-carbide cutting blades for powered cutting. Do not use a rough abrasive disc that melts or fractures the edge. [1]
After cutting, remove chips and swarf with a soft brush or clean compressed air. Do not drag metal shavings across the panel. On multiwall sheets, seal the channels with the specified solid and breathable tapes and end profiles; on corrugated sheets, ensure the cut edge will be protected by the planned flashing or overlap.
Remove Cutting Debris
After cutting:
- Remove chips using a soft brush.
- Use clean compressed air where appropriate.
- Do not drag metal shavings across the sheet.
- Inspect the cut edge for cracks or damage.
For multiwall polycarbonate sheets, seal the open channels using the specified solid tape, breathable tape, and end profiles.
For corrugated sheets, make sure the cut edge will be protected by the planned overlap or flashing.
9. Position the first sheet correctly
Begin at the lower edge and progress upward so every upper sheet laps over the lower sheet. In a multi-sheet run, start on the side opposite the prevailing weather and continue in one direction rather than working from both ends toward the middle. Align corrugations with the fall of the roof so water runs directly to the gutter. [1]
Place the sheet without stretching, twisting or forcing it. Maintain the specified side lap—often one or more corrugations depending on the profile and exposure—and the specified end lap. Do not rely on sealant to compensate for poor overlap geometry. Temporarily hold the panel with clamps or a few correctly positioned fixings, taking care not to damage the surface.
Do Not Force the Sheet
Place the sheet naturally over the roof profile.
Do not:
- Stretch the panel
- Twist the panel
- Force the ribs into alignment
- Pull the panel sideways
- Flatten the corrugations
Maintain the specified side and end overlaps. The required overlap may vary according to the sheet profile, roof pitch, and exposure conditions.
Sealant should support a correctly designed overlap. It should not be used to compensate for poor sheet alignment.
Temporarily secure the sheet using suitable clamps or a limited number of correctly positioned fasteners.
10. Create expansion holes and install the screws
For conventional fixing, mark the fastening points on the crest of corrugated roof sheets and pre-drill oversized holes in accordance with the manufacturer’s instructions. General guidance state that sheets up to 3.6 m require holes about 1.5 mm larger than the fastener shank, while longer sheets may require approximately 10 mm holes; the product-specific guide always takes precedence. [1]
When using BDN Fasteners™ POLY-FAST™, place the fastener at the centre of the crest over a purlin and hold the driver perpendicular to the sheet. The cutter forms the expansion hole as the screw advances, then the screw engages the steel or timber support. Keep the driver stable and release the trigger as the washer seats. The EPDM dome should contact and seal the sheet without being crushed flat or squeezed out from under the head. An angled screw creates uneven washer pressure and a distorted hole; an overdriven screw restrains movement and can deform the corrugation.
Follow the sheet manufacturer’s fixing schedule. End purlins and perimeter zones usually need closer fastening than protected internal supports, particularly in high-wind locations. Add fixings only where permitted; excessive screws do not compensate for inadequate framing and can introduce more restrained points.
Polycarbonate must be able to move around the fixing points.
When conventional fasteners are used, pre-drill oversized expansion holes according to the sheet manufacturer’s instructions.
The required hole diameter depends on:
- Fastener diameter
- Sheet length
- Expected temperature movement
- Polycarbonate product instructions
The sheet manufacturer’s specification should always take priority.
Installing POLY-FAST™ Fasteners
When using BDN FASTENERS® POLY-FAST™:
- Position the fastener at the center of the sheet crest.
- Confirm that the fastener is directly above a purlin or batten.
- Hold the driver perpendicular to the sheet.
- Drive the fastener at a controlled speed.
- Allow the integrated cutter to form the expansion hole.
- Continue until the screw engages the support.
- Stop when the EPDM washer is evenly seated.
The washer should contact the sheet and cover the expansion hole without being crushed flat.
Correct Washer Compression
Correct installation:
- The washer sits evenly against the sheet.
- The EPDM seal remains visible.
- The sheet profile is not distorted.
- The washer is not squeezed out from beneath the fastener head.
Incorrect installation:
- The screw is driven at an angle.
- The EPDM washer is crushed.
- The sheet crest is flattened.
- The screw is loose.
- The fastener misses the purlin.
- The sheet is restricted from moving.
An angled screw creates uneven washer pressure and may form a distorted opening. An overdriven screw can restrict thermal movement and damage the sheet.
Follow the Required Fastening Pattern
Follow the fastening schedule specified by the sheet manufacturer or project engineer.
Roof perimeter zones, corners, and end supports may require closer fastener spacing because they are exposed to higher wind forces.
Do not add unnecessary screws. More fasteners do not compensate for inadequate framing and can create additional points of restricted movement.
11. Complete the Overlaps, Flashings, and Seals
Install all side laps and end laps according to the roofing system specifications.
Use only sealants, tapes, and closures approved for polycarbonate.
Suitable materials may include:
- Neutral-cure polycarbonate-compatible silicone
- Approved butyl sealing tape
- Polycarbonate-compatible gasket materials
- Profile-matched foam closures
- Isolation tape
Avoid materials that may chemically react with polycarbonate.
Flashing Details
Depending on the skylight position, the installation may require:
- Apron flashing
- Head flashing
- Back-channel flashing
- Side flashing
- Barge capping
- Ridge capping
- Eave closures
At a wall or fascia, the head or apron flashing should extend sufficiently beneath the wall cladding and over the roof sheet to direct water onto the roof surface.
Where the skylight is located beneath an existing gutter or roof junction, a back-channel flashing may be required before the sheets are installed.
Foam Closures
Foam closures should match the roof profile.
Install them so they help block:
- Wind-driven rain
- Dust
- Insects
- Debris
Closures should not block the intended drainage path or trap water beneath the sheet.
12. Inspect and Water-Test the Skylight
After installation, remove:
- Protective film
- Product labels
- Cutting debris
- Metal shavings
- Loose sealant
- Construction waste
Inspect every fastener.
Confirm that:
- Each screw is vertical.
- Every fastener has engaged the support.
- The washers are compressed evenly.
- The roof profile is not distorted.
- The overlaps lie flat.
- The flashing has a continuous slope.
- The sealant joints are complete.
- There are no unsupported sheet edges.
- The gutter and drainage paths are clear.
How to Water-Test a Skylight
Use a gentle flow of water from a hose.
Begin at the lower part of the skylight and gradually move upward. This helps identify the level at which water begins to enter.
Do not spray high-pressure water upward beneath the sheet overlaps. A high-pressure jet does not accurately represent normal rainfall.
Observe the underside of the roof during the test.
When moisture is found, identify the actual entry point. Do not simply apply additional sealant over the visible wet area.
Check whether the problem is caused by:
- An incorrect overlap
- A loose or overdriven fastener
- Uneven washer compression
- Incomplete flashing
- An incompatible sealant
- A missing closure
- A damaged sheet
- Poor drainage
Correct the underlying detail before repeating the water test.
Common Skylight Installation Mistakes
Avoid these common mistakes when fitting a polycarbonate skylight:
Using a Mismatched Roof Profile
An incompatible sheet may not sit correctly against the surrounding metal roofing, creating stress and gaps.
Installing the Skylight on an Insufficient Roof Slope
Low-pitch roofs drain more slowly and place greater pressure on overlaps, fasteners, and flashing.
Using Tight Fastener Holes
Polycarbonate needs space to expand and contract. Tight holes may cause cracking, buckling, or enlarged openings.
Overtightening the Fasteners
Excessive pressure can crush the EPDM washer, distort the sheet, and prevent thermal movement.
Driving Screws at an Angle
Angled fasteners create uneven washer pressure and reduce sealing performance.
Missing the Purlin or Batten
A fastener that does not engage the supporting structure cannot provide secure fixing.
Using Incompatible Sealant
Some sealants and gasket materials can damage polycarbonate or lose adhesion.
Relying on Sealant Instead of Correct Flashing
Sealant should not replace properly designed overlaps and flashing details.
Forcing the Sheet Into Position
Stretching or twisting the sheet introduces stress and may cause premature failure.
Walking Directly on the Sheet
Polycarbonate roofing is not designed to support concentrated foot traffic.
Leaving Metal Shavings on the Roof
Metal swarf can stain the sheet, damage protective surfaces, and cause corrosion on nearby roofing materials.
Leaving the Protective Film in Place
Protective film exposed to sunlight for too long may become difficult to remove.
Skylight Maintenance After Installation
Inspect the skylight after the first major storm and then periodically.
Maintenance should include:
- Removing leaves and debris
- Cleaning gutters and drainage channels
- Inspecting fasteners and EPDM washers
- Checking flashing and sealant joints
- Looking for movement at overlaps
- Checking closures and infill strips
- Inspecting the sheet for cracks or discoloration
Clean the polycarbonate sheet using water, mild soap, and a soft cloth or sponge.
Avoid:
- Abrasive cleaning pads
- Harsh solvents
- Strong alkaline cleaners
- Sharp tools
- Chemicals not approved by the sheet manufacturer
Regular maintenance helps preserve light transmission and allows small problems to be corrected before they develop into serious leaks.
Final Skylight Installation Checklist
Before considering the installation complete, confirm the following:
- The polycarbonate sheet matches the adjoining roof profile.
- The sheet was installed without stretching or forcing.
- The roof pitch provides adequate drainage.
- Purlin or batten spacing complies with the selected roofing system.
- Structural supports are sound and properly aligned.
- The UV-protected face is installed toward the sun.
- The sheet has sufficient space for thermal expansion.
- The fastener is suitable for steel, timber, or mixed substrates.
- Each fastener has sufficient penetration into the support.
- Screws are installed at the correct fixing positions.
- All fasteners are perpendicular to the sheet.
- The EPDM washers are seated evenly.
- No washer has been overtightened or crushed.
- Side laps and end laps are correctly positioned.
- Flashings and closures are continuous.
- Only polycarbonate-compatible sealing materials were used.
- Protective film and cutting debris have been removed.
- Gutters and drainage paths are clear.
- The finished skylight has passed a controlled water test.
Conclusion
Learning how to fit a skylight involves more than cutting an opening and installing a transparent roof sheet.
A reliable polycarbonate skylight installation starts with a compatible roof profile, adequate structural support, sufficient roof slope, and effective drainage. The sheet must be cut and positioned correctly, while every fixing point must allow for thermal expansion.
Dedicated BDN FASTENERS® POLY-FAST™ and POLYXPAND™ skylight fasteners are designed to support expansion-hole creation, secure substrate fixing, and EPDM weather sealing. However, they must still be selected according to the actual support material and installed vertically with controlled washer compression.
When the polycarbonate sheet, fasteners, overlaps, flashings, closures, and drainage system work together, the skylight can provide natural daylight with dependable and weather-resistant performance.
Find the Right Fasteners for Your Polycarbonate Skylight
BDN FASTENERS® provides specialized fixing solutions for profiled polycarbonate roofing installed over steel, timber, and mixed substrates.
Explore:
- POLY-FAST™ Polycarbonate Roofing Fasteners
- POLYXPAND™ Skylight Fixing Fasteners
- Metal Roofing Fasteners
- Timber Roofing Fasteners
For product specifications or fastening recommendations, contact the BDN FASTENERS® team before installation.
Important: Product specifications, capacities, installation instructions, and warranties may change. Always confirm the latest technical information for the selected sheet profile, fastener, substrate, and project location.
Final installation checklist
- The roof profile, sheet profile and side laps match without forcing.
- The roof pitch, purlin spacing and structural supports comply with the selected system.
- The UV-protected face is oriented correctly and the sheet has room to expand.
- The fastener matches steel, timber or mixed substrates and has sufficient penetration.
- Screws are centred on crests, perpendicular to the sheet and not over-tightened.
- EPDM washers are seated evenly; flashings, infills and compatible seals are continuous.
All swarf and protective film are removed, and the completed roof passes a controlled water test.
References and source material
[1] BDN Fasteners™, “How to Install Plastic Corrugated Roofing? A Step-by-Step Guide!” https://dev5.blupaperdev.com/how-to-install-plastic-corrugated-roofing-a-step-by-step-guide/
[2] BDN Fasteners™, “Polycarbonate Roofing Fasteners Series — POLY-FAST™.” https://dev5.blupaperdev.com/roofing-screws/polycarbonate-roof-fasteners/poly-fast/
[3] BDN Fasteners™, “Skylights in Metal Roofs: Key Considerations and Installation Tips.” https://dev5.blupaperdev.com/skylights-in-metal-roofs-key-considerations-and-installation-tips/
[4] BDN Fasteners, “POLYXPAND™ Skylight Fixing Fasteners.” https://dev5.blupaperdev.com/roofing-screws/self-drilling-screws/skylight-fixing-fasteners/